Iceberg catalog
This example uses the Local Climatological Data(LCD) dataset featured in the StarRocks Basics Quick Start. You can load the data and try the example yourself.
An Iceberg catalog is a type of external catalog that is supported by StarRocks from v2.4 onwards. With Iceberg catalogs, you can:
- Directly query data stored in Iceberg without the need to manually create tables.
- Use INSERT INTO or asynchronous materialized views (which are supported from v2.5 onwards) to process data stored in Iceberg and load the data into StarRocks.
- Perform operations on StarRocks to create or drop Iceberg databases and tables, or sink data from StarRocks tables to Parquet-formatted Iceberg tables by using INSERT INTO (this feature is supported from v3.1 onwards).
To ensure successful SQL workloads on your Iceberg cluster, your StarRocks cluster must be able to access the storage system and metastore of your Iceberg cluster. StarRocks supports the following storage systems and metastores:
-
Distributed file system (HDFS) or object storage like AWS S3, Microsoft Azure Storage, Google GCS, or other S3-compatible storage system (for example, MinIO)
-
Metastore like Hive metastore, AWS Glue, or Tabular
- If you choose AWS S3 as storage, you can use HMS or AWS Glue as metastore. If you choose any other storage system, you can only use HMS as metastore.
- If you choose Tabular as metastore, you need to use the Iceberg REST catalog.
Usage notes
Take note of the following points when you use StarRocks to query data from Iceberg:
| File format | Compression format | Iceberg table version |
|---|---|---|
| Parquet | SNAPPY, LZ4, ZSTD, GZIP, and NO_COMPRESSION |
|
| ORC | ZLIB, SNAPPY, LZO, LZ4, ZSTD, and NO_COMPRESSION |
|
Integration preparation
Before you create an Iceberg catalog, make sure your StarRocks cluster can integrate with the storage system and metastore of your Iceberg cluster.
Storage
Select the tab that matches your storage type:
- AWS S3
- HDFS
If your Iceberg cluster uses AWS S3 as storage or AWS Glue as metastore, choose your suitable authentication method and make the required preparations to ensure that your StarRocks cluster can access the related AWS cloud resources.
The following authentication methods are recommended:
- Instance profile
- Assumed role
- IAM user
Of the above-mentioned three authentication methods, instance profile is the most widely used.
For more information, see Preparation for authentication in AWS IAM.
If you choose HDFS as storage, configure your StarRocks cluster as follows:
-
(Optional) Set the username that is used to access your HDFS cluster and Hive metastore. By default, StarRocks uses the username of the FE and BE or CN processes to access your HDFS cluster and Hive metastore. You can also set the username by adding
export HADOOP_USER_NAME="<user_name>"at the beginning of the fe/conf/hadoop_env.sh file of each FE and at the beginning of the be/conf/hadoop_env.sh file of each BE or the cn/conf/hadoop_env.sh file of each CN. After you set the username in these files, restart each FE and each BE or CN to make the parameter settings take effect. You can set only one username for each StarRocks cluster. -
When you query Iceberg data, the FEs and BEs or CNs of your StarRocks cluster use the HDFS client to access your HDFS cluster. In most cases, you do not need to configure your StarRocks cluster to achieve that purpose, and StarRocks starts the HDFS client using the default configurations. You need to configure your StarRocks cluster only in the following situations:
- High availability (HA) is enabled for your HDFS cluster: Add the hdfs-site.xml file of your HDFS cluster to the $FE_HOME/conf path of each FE and to the $BE_HOME/conf path of each BE or the $CN_HOME/conf path of each CN.
- View File System (ViewFs) is enabled for your HDFS cluster: Add the core-site.xml file of your HDFS cluster to the $FE_HOME/conf path of each FE and to the $BE_HOME/conf path of each BE or the $CN_HOME/conf path of each CN.
If an error indicating an unknown host is returned when you send a query, you must add the mapping between the host names and IP addresses of your HDFS cluster nodes to the /etc/hosts path.
Kerberos authentication
If Kerberos authentication is enabled for your HDFS cluster or Hive metastore, configure your StarRocks cluster as follows:
- Run the
kinit -kt keytab_path principalcommand on each FE and each BE or CN to obtain Ticket Granting Ticket (TGT) from Key Distribution Center (KDC). To run this command, you must have the permissions to access your HDFS cluster and Hive metastore. Note that accessing KDC with this command is time-sensitive. Therefore, you need to use cron to run this command periodically. - Add
JAVA_OPTS="-Djava.security.krb5.conf=/etc/krb5.conf"to the $FE_HOME/conf/fe.conf file of each FE and to the $BE_HOME/conf/be.conf file of each BE or the $CN_HOME/conf/cn.conf file of each CN. In this example,/etc/krb5.confis the save path of the krb5.conf file. You can modify the path based on your needs.
Create an Iceberg catalog
Syntax
CREATE EXTERNAL CATALOG <catalog_name>
[COMMENT <comment>]
PROPERTIES
(
    "type" = "iceberg",
    [SecurityParams],
    MetastoreParams,
    StorageCredentialParams,
    MetadataRelatedParams
)
Parameters
catalog_name
The name of the Iceberg catalog. The naming conventions are as follows:
- The name can contain letters, digits (0-9), and underscores (_). It must start with a letter.
- The name is case-sensitive and cannot exceed 1023 characters in length.
comment
The description of the Iceberg catalog. This parameter is optional.
type
The type of your data source. Set the value to iceberg.
SecurityParams
Parameter(s) about how StarRocks manages data access to the catalog.
For detailed instructions on managing data access for Iceberg Catalogs, see Security Setup for Iceberg REST Catalog.
catalog.access.control
The data access control policy. Valid values:
native(Default): The StarRocks built-in data access control system is used.allowall: All data access checks are delegated to the Catalog itself.ranger: Data access checks are delegated to Apache Ranger.
MetastoreParams
A set of parameters about how StarRocks integrates with the metastore of your data source. Choose the tab that matches your metastore type:
- Hive metastore
- AWS Glue
- REST
- JDBC
Hive metastore
If you choose Hive metastore as the metastore of your data source, configure MetastoreParams as follows:
"iceberg.catalog.type" = "hive",
"hive.metastore.uris" = "<hive_metastore_uri>"
Before querying Iceberg data, you must add the mapping between the host names and IP addresses of your Hive metastore nodes to the /etc/hosts path. Otherwise, StarRocks may fail to access your Hive metastore when you start a query.
The following table describes the parameter you need to configure in MetastoreParams.
-
iceberg.catalog.type- Required: Yes
- Description: The type of metastore that you use for your Iceberg cluster. Set the value to
hive.
-
hive.metastore.uris- Required: Yes
- Description: The URI of your Hive metastore. Format:
thrift://<metastore_IP_address>:<metastore_port>.
If high availability (HA) is enabled for your Hive metastore, you can specify multiple metastore URIs and separate them with commas (,), for example,"thrift://<metastore_IP_address_1>:<metastore_port_1>,thrift://<metastore_IP_address_2>:<metastore_port_2>,thrift://<metastore_IP_address_3>:<metastore_port_3>".
AWS Glue
If you choose AWS Glue as the metastore of your data source, which is supported only when you choose AWS S3 as storage, take one of the following actions:
-
To choose the instance profile-based authentication method, configure
MetastoreParamsas follows:"iceberg.catalog.type" = "glue",
"aws.glue.use_instance_profile" = "true",
"aws.glue.region" = "<aws_glue_region>" -
To choose the assumed role-based authentication method, configure
MetastoreParamsas follows:"iceberg.catalog.type" = "glue",
"aws.glue.use_instance_profile" = "true",
"aws.glue.iam_role_arn" = "<iam_role_arn>",
"aws.glue.region" = "<aws_glue_region>" -
To choose the IAM user-based authentication method, configure
MetastoreParamsas follows:"iceberg.catalog.type" = "glue",
"aws.glue.use_instance_profile" = "false",
"aws.glue.access_key" = "<iam_user_access_key>",
"aws.glue.secret_key" = "<iam_user_secret_key>",
"aws.glue.region" = "<aws_s3_region>"
MetastoreParams for AWS Glue:
-
iceberg.catalog.type- Required: Yes
- Description: The type of metastore that you use for your Iceberg cluster. Set the value to
glue.
-
aws.glue.use_instance_profile- Required: Yes
- Description: Specifies whether to enable the instance profile-based authentication method and the assumed role-based authentication method. Valid values:
trueandfalse. Default value:false.
-
aws.glue.iam_role_arn- Required: No
- Description: The ARN of the IAM role that has privileges on your AWS Glue Data Catalog. If you use the assumed role-based authentication method to access AWS Glue, you must specify this parameter.
-
aws.glue.region- Required: Yes
- Description: The region in which your AWS Glue Data Catalog resides. Example:
us-west-1.
-
aws.glue.access_key- Required: No
- Description: The access key of your AWS IAM user. If you use the IAM user-based authentication method to access AWS Glue, you must specify this parameter.
-
aws.glue.secret_key- Required: No
- Description: The secret key of your AWS IAM user. If you use the IAM user-based authentication method to access AWS Glue, you must specify this parameter.
-
aws.glue.catalog_id- Required: No
- Description: The ID of the AWS Glue Data Catalog to use. When not specified, the catalog in the current AWS account is used. You must specify this parameter when you need to access a Glue Data Catalog in a different AWS account (cross-account access).
For information about how to choose an authentication method for accessing AWS Glue and how to configure an access control policy in the AWS IAM Console, see Authentication parameters for accessing AWS Glue.
REST
For detailed instructions on creating an Iceberg REST catalog for S3 tables, see Create Iceberg REST Catalog for AWS S3 tables.
If you use REST as metastore, you must specify the metastore type as REST ("iceberg.catalog.type" = "rest"). Configure MetastoreParams as follows:
"iceberg.catalog.type" = "rest",
"iceberg.catalog.uri" = "<rest_server_api_endpoint>",
"iceberg.catalog.security" = "oauth2",
"iceberg.catalog.oauth2.credential" = "<credential>",
"iceberg.catalog.warehouse" = "<identifier_or_path_to_warehouse>"
MetastoreParams for REST catalog:
-
iceberg.catalog.type- Required: Yes
- Description: The type of metastore that you use for your Iceberg cluster. Set the value to
rest. -
-
iceberg.catalog.uri- Required: Yes
- Description: The URI of the REST service endpoint. Example:
https://api.tabular.io/ws. -
-
iceberg.catalog.view-endpoints-supported- Required: No
- Description: Whether to use the view endpoints to support view-related operations when the REST service of earlier versions that does not return endpoints in
CatalogConfig. This parameter is used for backwards compatibility with REST servers of early versions. Default:false.
-
iceberg.catalog.security- Required: No
- Description: The type of authorization protocol to use. Default:
NONE. Valid values:OAUTH2andJWT. When this item is set toOAUTH2, eithertokenorcredentialis required. When this item is set toJWT, the user is required to log in to the StarRocks cluster using theJWTmethod. You can omittokenorcredentialand StarRocks will use the logged in user's JWT to access the catalog.
-
iceberg.catalog.oauth2.token- Required: No
- Description: The bearer token used for interactions with the server. A
tokenorcredentialis required forOAUTH2authorization protocol. Example:AbCdEf123456.
-
iceberg.catalog.oauth2.credential- Required: No
- Description: The credential to exchange for a token in the OAuth2 client credentials flow with the server. A
tokenorcredentialis required forOAUTH2authorization protocol. Example:AbCdEf123456.
-
iceberg.catalog.oauth2.scope- Required: No
- Description: Scope to be used when communicating with the REST Catalog. Applicable only when
credentialis used.
-
iceberg.catalog.oauth2.server-uri- Required: No
- Description: The endpoint to retrieve access token from OAuth2 Server.
-
iceberg.catalog.vended-credentials-enabled- Required: No
- Description: Whether to use credentials provided by REST backend for file system access. Default:
true.
-
iceberg.catalog.warehouse- Required: No
- Description: The warehouse location or identifier of the Iceberg catalog. Example:
s3://my_bucket/warehouse_locationorsandbox. -
-
iceberg.catalog.rest.nested-namespace-enabled- Required: No
- Description: Whether to support querying objects under nested namespace. Default:
false.
-
iceberg.catalog.rest.view-endpoints-enabled- Required: No
- Description: Whether to enable view endpoints for view-related operations. If set to
false, view operations likegetViewwill be disabled. Default:true.
The following example creates an Iceberg catalog named tabular that uses Tabular as metastore:
CREATE EXTERNAL CATALOG tabular
PROPERTIES
(
    "type" = "iceberg",
    "iceberg.catalog.type" = "rest",
    "iceberg.catalog.uri" = "https://api.tabular.io/ws",
    "iceberg.catalog.oauth2.credential" = "t-5Ii8e3FIbT9m0:aaaa-3bbbbbbbbbbbbbbbbbbb",
    "iceberg.catalog.warehouse" = "sandbox"
);
The following example creates an Iceberg catalog named smith_polaris that uses Polaris as metastore:
CREATE EXTERNAL CATALOG smith_polaris
PROPERTIES (
    "iceberg.catalog.uri"  = "http://xxx.xx.xx.xxx:8181/api/catalog",
    "type"  =  "iceberg",
    "iceberg.catalog.type"  =  "rest",
    "iceberg.catalog.warehouse" = "starrocks_catalog",
    "iceberg.catalog.security" = "oauth2",
    "iceberg.catalog.oauth2.credential" = "xxxxxxxxxxxxxxxxxxxxxxxxxxxxxxxxxxxx",
    "iceberg.catalog.oauth2.scope"='PRINCIPAL_ROLE:ALL'
 );

# `ns1.ns2.tpch_namespace` is a nested namespace
create table smith_polaris.`ns1.ns2.tpch_namespace`.tbl (c1 string);

mysql> select * from smith_polaris.`ns1.ns2.tpch_namespace`.tbl;
+------+
| c1   |
+------+
| 1    |
| 2    |
| 3    |
+------+
3 rows in set (0.34 sec)
The following example creates an Iceberg catalog named r2 that uses Cloudflare R2 Data Catalog as metastore:
CREATE EXTERNAL CATALOG r2
PROPERTIES
(
    "type" = "iceberg",
    "iceberg.catalog.type" = "rest",
    "iceberg.catalog.uri" = "<r2_catalog_uri>",
    "iceberg.catalog.security" = "oauth2",
    "iceberg.catalog.oauth2.token" = "<r2_api_token>",
    "iceberg.catalog.warehouse" = "<r2_warehouse_name>"
);

SET CATALOG r2;

CREATE DATABASE testdb;

SHOW DATABASES FROM r2;

+--------------------+
| Database           |
+--------------------+
| information_schema |
| testdb             |
+--------------------+
2 rows in set (0.66 sec)
The <r2_warehouse_name>,<r2_api_token>, and <r2_catalog_uri> values are obtained from the Cloudflare Dashboard as detailed here.
JDBC
If you choose JDBC as the metastore of your data source, configure MetastoreParams as follows:
"iceberg.catalog.type" = "jdbc",
"iceberg.catalog.uri" = "<jdbc_uri>",
"iceberg.catalog.warehouse" = "<warehouse_location>"
The following table describes the parameter you need to configure in MetastoreParams.
-
iceberg.catalog.type- Required: Yes
- Description: The type of metastore that you use for your Iceberg cluster. Set the value to
jdbc.
-
iceberg.catalog.uri- Required: Yes
- Description: The URI of your database. Format:
jdbc:[mysql\|postgresql]://<DB_IP_address>:<DB_PORT>/<DB_NAME>.
-
iceberg.catalog.warehouse- Required: Yes
- Description: The warehouse location or identifier of the Iceberg catalog. Example:
s3://my_bucket/warehouse_location.
-
iceberg.catalog.jdbc.user- Required: No
- Description: The username for the database.
-
iceberg.catalog.jdbc.password- Required: No
- Description: The password for the database.
-
iceberg.catalog.jdbc.init-catalog-tables- Required: No
- Description: Whether to create the tables
iceberg_namespace_propertiesandiceberg_tablesfor storing metadata in the database specified byiceberg.catalog.uri. The default value isfalse. Specifytrueif these two tables have not yet been created in the database specified byiceberg.catalog.uri.
The following example creates an Iceberg catalog named iceberg_jdbc and uses JDBC as metastore:
CREATE EXTERNAL CATALOG iceberg_jdbc
PROPERTIES
(
    "type" = "iceberg",
    "iceberg.catalog.type" = "jdbc",
    "iceberg.catalog.warehouse" = "s3://my_bucket/warehouse_location",
    "iceberg.catalog.uri" = "jdbc:mysql://ip:port/db_name",
    "iceberg.catalog.jdbc.user" = "username",
    "iceberg.catalog.jdbc.password" = "password",
    "aws.s3.endpoint" = "<s3_endpoint>",
    "aws.s3.access_key" = "<iam_user_access_key>",
    "aws.s3.secret_key" = "<iam_user_secret_key>"
);
If using MySQL or other custom JDBC drivers, the corresponding JAR files need to be placed in the fe/lib and be/lib/jni-packages directories.
StorageCredentialParams
A set of parameters about how StarRocks integrates with your storage system. This parameter set is optional.
Note the following points:
-
If you use HDFS as storage, you do not need to configure
StorageCredentialParamsand can skip this section. If you use AWS S3, other S3-compatible storage system, Microsoft Azure Storage, or Google GCS as storage, you must configureStorageCredentialParams. -
If you use Tabular as metastore, you do not need to configure
StorageCredentialParamsand can skip this section. If you use HMS or AWS Glue as metastore, you must configureStorageCredentialParams.
Choose the tab that matches your storage type:
- AWS S3
- HDFS
- MinIO
- Microsoft Azure Blob Storage
- Google GCS
AWS S3
If you choose AWS S3 as storage for your Iceberg cluster, take one of the following actions:
-
To choose the instance profile-based authentication method, configure
StorageCredentialParamsas follows:"aws.s3.use_instance_profile" = "true",
"aws.s3.region" = "<aws_s3_region>" -
To choose the assumed role-based authentication method, configure
StorageCredentialParamsas follows:"aws.s3.use_instance_profile" = "true",
"aws.s3.iam_role_arn" = "<iam_role_arn>",
"aws.s3.region" = "<aws_s3_region>" -
To choose the IAM user-based authentication method, configure
StorageCredentialParamsas follows:"aws.s3.use_instance_profile" = "false",
"aws.s3.access_key" = "<iam_user_access_key>",
"aws.s3.secret_key" = "<iam_user_secret_key>",
"aws.s3.region" = "<aws_s3_region>" -
To choose vended credential (supported from v4.0 onwards) with the REST catalog, configure
StorageCredentialParamsas follows:"aws.s3.region" = "<aws_s3_region>"
StorageCredentialParams for AWS S3:
aws.s3.use_instance_profile
- Required: Yes
- Description: Specifies whether to enable the instance profile-based authentication method and the assumed role-based authentication method. Valid values:
trueandfalse. Default value:false.
aws.s3.iam_role_arn
- Required: No
- Description: The ARN of the IAM role that has privileges on your AWS S3 bucket. If you use the assumed role-based authentication method to access AWS S3, you must specify this parameter.
aws.s3.region
- Required: Yes
- Description: The region in which your AWS S3 bucket resides. Example:
us-west-1.
aws.s3.access_key
- Required: No
- Description: The access key of your IAM user. If you use the IAM user-based authentication method to access AWS S3, you must specify this parameter.
aws.s3.secret_key
- Required: No
- Description: The secret key of your IAM user. If you use the IAM user-based authentication method to access AWS S3, you must specify this parameter.
For information about how to choose an authentication method for accessing AWS S3 and how to configure an access control policy in AWS IAM Console, see Authentication parameters for accessing AWS S3.
When using HDFS storage skip the storage credentials.
S3-compatible storage system
Iceberg catalogs support S3-compatible storage systems from v2.5 onwards.
If you choose an S3-compatible storage system, such as MinIO, as storage for your Iceberg cluster, configure StorageCredentialParams as follows to ensure a successful integration:
"aws.s3.enable_ssl" = "false",
"aws.s3.enable_path_style_access" = "true",
"aws.s3.endpoint" = "<s3_endpoint>",
"aws.s3.access_key" = "<iam_user_access_key>",
"aws.s3.secret_key" = "<iam_user_secret_key>"
StorageCredentialParams for MinIO and other S3 compatible systems:
aws.s3.enable_ssl
- Required: Yes
- Description: Specifies whether to enable SSL connection.
Valid values:trueandfalse. Default value:true.
aws.s3.enable_path_style_access
- Required: Yes
- Description: Specifies whether to enable path-style access.
Valid values:trueandfalse. Default value:false. For MinIO, you must set the value totrue.
Path-style URLs use the following format:https://s3.<region_code>.amazonaws.com/<bucket_name>/<key_name>. For example, if you create a bucket namedDOC-EXAMPLE-BUCKET1in the US West (Oregon) Region, and you want to access thealice.jpgobject in that bucket, you can use the following path-style URL:https://s3.us-west-2.amazonaws.com/DOC-EXAMPLE-BUCKET1/alice.jpg.
aws.s3.endpoint
- Required: Yes
- Description: The endpoint that is used to connect to your S3-compatible storage system instead of AWS S3.
aws.s3.access_key
- Required: Yes
- Description: The access key of your IAM user.
aws.s3.secret_key
- Required: Yes
- Description: The secret key of your IAM user.
Microsoft Azure Storage
Iceberg catalogs support Microsoft Azure Storage from v3.0 onwards.
Azure Blob Storage
If you choose Blob Storage as storage for your Iceberg cluster, take one of the following actions:
-
To choose the Shared Key authentication method, configure
StorageCredentialParamsas follows:"azure.blob.storage_account" = "<storage_account_name>",
"azure.blob.shared_key" = "<storage_account_shared_key>" -
To choose the SAS Token authentication method, configure
StorageCredentialParamsas follows:"azure.blob.storage_account" = "<storage_account_name>",
"azure.blob.container" = "<container_name>",
"azure.blob.sas_token" = "<storage_account_SAS_token>" -
To choose REST catalog with vended credential (supported from v4.0 onwards), you do not need to configure
StorageCredentialParams.
StorageCredentialParams for Microsoft Azure:
azure.blob.storage_account
- Required: Yes
- Description: The username of your Blob Storage account.
azure.blob.shared_key
- Required: Yes
- Description: The shared key of your Blob Storage account.
azure.blob.account_name
- Required: Yes
- Description: The username of your Blob Storage account.
azure.blob.container
- Required: Yes
- Description: The name of the blob container that stores your data.
azure.blob.sas_token
- Required: Yes
- Description: The SAS token that is used to access your Blob Storage account.
Azure Data Lake Storage Gen1
If you choose Data Lake Storage Gen1 as storage for your Iceberg cluster, take one of the following actions:
-
To choose the Managed Service Identity authentication method, configure
StorageCredentialParamsas follows:"azure.adls1.use_managed_service_identity" = "true"
Or:
-
To choose the Service Principal authentication method, configure
StorageCredentialParamsas follows:"azure.adls1.oauth2_client_id" = "<application_client_id>",
"azure.adls1.oauth2_credential" = "<application_client_credential>",
"azure.adls1.oauth2_endpoint" = "<OAuth_2.0_authorization_endpoint_v2>"
Azure Data Lake Storage Gen2
If you choose Data Lake Storage Gen2 as storage for your Iceberg cluster, take one of the following actions:
-
To choose the Managed Identity authentication method, configure
StorageCredentialParamsas follows:"azure.adls2.oauth2_use_managed_identity" = "true",
"azure.adls2.oauth2_tenant_id" = "<service_principal_tenant_id>",
"azure.adls2.oauth2_client_id" = "<service_client_id>"Or:
-
To choose the Shared Key authentication method, configure
StorageCredentialParamsas follows:"azure.adls2.storage_account" = "<storage_account_name>",
"azure.adls2.shared_key" = "<storage_account_shared_key>"Or:
-
To choose the Service Principal authentication method, configure
StorageCredentialParamsas follows:"azure.adls2.oauth2_client_id" = "<service_client_id>",
"azure.adls2.oauth2_client_secret" = "<service_principal_client_secret>",
"azure.adls2.oauth2_client_endpoint" = "<service_principal_client_endpoint>" -
To choose REST catalog with vended credential (supported from v4.0 onwards), you do not need to configure
StorageCredentialParams.
Google GCS
Iceberg catalogs support Google GCS from v3.0 onwards.
If you choose Google GCS as storage for your Iceberg cluster, take one of the following actions:
-
To choose the VM-based authentication method, configure
StorageCredentialParamsas follows:"gcp.gcs.use_compute_engine_service_account" = "true" -
To choose the service account-based authentication method, configure
StorageCredentialParamsas follows:"gcp.gcs.service_account_email" = "<google_service_account_email>",
"gcp.gcs.service_account_private_key_id" = "<google_service_private_key_id>",
"gcp.gcs.service_account_private_key" = "<google_service_private_key>" -
To choose the impersonation-based authentication method, configure
StorageCredentialParamsas follows:-
Make a VM instance impersonate a service account:
"gcp.gcs.use_compute_engine_service_account" = "true",
"gcp.gcs.impersonation_service_account" = "<assumed_google_service_account_email>" -
Make a service account (temporarily named as meta service account) impersonate another service account (temporarily named as data service account):
"gcp.gcs.service_account_email" = "<google_service_account_email>",
"gcp.gcs.service_account_private_key_id" = "<meta_google_service_account_email>",
"gcp.gcs.service_account_private_key" = "<meta_google_service_account_email>",
"gcp.gcs.impersonation_service_account" = "<data_google_service_account_email>"
-
-
To choose REST catalog with vended credential (supported from v4.0 onwards), you do not need to configure
StorageCredentialParams.
StorageCredentialParams for Google GCS:
gcp.gcs.service_account_email
- Default value: ""
- Example: "user@hello.iam.gserviceaccount.com"
- Description: The email address in the JSON file generated at the creation of the service account.
gcp.gcs.service_account_private_key_id
- Default value: ""
- Example: "61d257bd8479547cb3e04f0b9b6b9ca07af3b7ea"
- Description: The private key ID in the JSON file generated at the creation of the service account.
gcp.gcs.service_account_private_key
- Default value: ""
- Example: "-----BEGIN PRIVATE KEY----xxxx-----END PRIVATE KEY-----\n"
- Description: The private key in the JSON file generated at the creation of the service account.
gcp.gcs.impersonation_service_account
- Default value: ""
- Example: "hello"
- Description: The service account that you want to impersonate.
MetadataRelatedParams
A set of parameters about cache of the Iceberg metadata in StarRocks. This parameter set is optional.
From v3.3.3 onwards, StarRocks supports the periodic metadata refresh strategy. In most cases, you can ignore the parameters below and do not need to tune the policy parameters in it, because the default values of these parameters already provide you with performance out-of-the-box. You can adjust the Iceberg metadata parsing mode using the system variable plan_mode.
| Parameter | Default | Description |
|---|---|---|
| enable_iceberg_metadata_cache | true | Whether to cache Iceberg-related metadata, including Table Cache, Partition Name Cache, and the Data File Cache and Delete Data File Cache in Manifest. |
| iceberg_manifest_cache_with_column_statistics | false | Whether to cache the statistics of columns. |
| refresh_iceberg_manifest_min_length | 2 * 1024 * 1024 | The minimum Manifest file length that triggers a Data File Cache refresh. |
| iceberg_data_file_cache_memory_usage_ratio | 0.1 | The maximum memory usage ratio for the data file Manifest cache. Supported from v3.5.6 onwards. |
| iceberg_delete_file_cache_memory_usage_ratio | 0.1 | The maximum memory usage ratio for the delete file Manifest cache. Supported from v3.5.6 onwards. |
| iceberg_table_cache_refresh_interval_sec | 60 | The interval (in seconds) at which the asynchronous refresh of the Iceberg table cache is triggered. Supported from v3.5.7 onwards. |
Starting from v3.4, StarRocks can obtain statistics of Iceberg tables by reading Iceberg metadata through setting the following parameters, without actively triggering the collection of Iceberg table statistics.
| Parameter | Default | Description |
|---|---|---|
| enable_get_stats_from_external_metadata | false | Whether to obtain statistics from Iceberg metadata. When this item is set to true, you can further control which type of statistics to collect through the session variable enable_get_stats_from_external_metadata. |
Examples
The following examples create an Iceberg catalog named iceberg_catalog_hms or iceberg_catalog_glue, depending on the type of metastore you use, to query data from your Iceberg cluster. Chose the tab that matches your storage type:
- AWS S3
- HDFS
- MinIO
- Microsoft Azure Blob Storage
- Google GCS
AWS S3
If you choose instance profile-based credential
-
If you use Hive metastore in your Iceberg cluster, run a command like below:
CREATE EXTERNAL CATALOG iceberg_catalog_hms
PROPERTIES
(
"type" = "iceberg",
"iceberg.catalog.type" = "hive",
"hive.metastore.uris" = "thrift://xx.xx.xx.xx:9083",
"aws.s3.use_instance_profile" = "true",
"aws.s3.region" = "us-west-2"
); -
If you use AWS Glue in your Amazon EMR Iceberg cluster, run a command like below:
CREATE EXTERNAL CATALOG iceberg_catalog_glue
PROPERTIES
(
"type" = "iceberg",
"iceberg.catalog.type" = "glue",
"aws.glue.use_instance_profile" = "true",
"aws.glue.region" = "us-west-2",
"aws.s3.use_instance_profile" = "true",
"aws.s3.region" = "us-west-2"
);
If you choose assumed role-based credential
-
If you use Hive metastore in your HIceberg cluster, run a command like below:
CREATE EXTERNAL CATALOG iceberg_catalog_hms
PROPERTIES
(
"type" = "iceberg",
"iceberg.catalog.type" = "hive",
"hive.metastore.uris" = "thrift://xx.xx.xx.xx:9083",
"aws.s3.use_instance_profile" = "true",
"aws.s3.iam_role_arn" = "arn:aws:iam::081976408565:role/test_s3_role",
"aws.s3.region" = "us-west-2"
); -
If you use AWS Glue in your Amazon EMR Iceberg cluster, run a command like below:
CREATE EXTERNAL CATALOG iceberg_catalog_glue
PROPERTIES
(
"type" = "iceberg",
"iceberg.catalog.type" = "glue",
"aws.glue.use_instance_profile" = "true",
"aws.glue.iam_role_arn" = "arn:aws:iam::081976408565:role/test_glue_role",
"aws.glue.region" = "us-west-2",
"aws.s3.use_instance_profile" = "true",
"aws.s3.iam_role_arn" = "arn:aws:iam::081976408565:role/test_s3_role",
"aws.s3.region" = "us-west-2"
);
If you choose IAM user-based credential
-
If you use Hive metastore in your Iceberg cluster, run a command like below:
CREATE EXTERNAL CATALOG iceberg_catalog_hms
PROPERTIES
(
"type" = "iceberg",
"iceberg.catalog.type" = "hive",
"hive.metastore.uris" = "thrift://xx.xx.xx.xx:9083",
"aws.s3.use_instance_profile" = "false",
"aws.s3.access_key" = "<iam_user_access_key>",
"aws.s3.secret_key" = "<iam_user_access_key>",
"aws.s3.region" = "us-west-2"
); -
If you use AWS Glue in your Amazon EMR Iceberg cluster, run a command like below:
CREATE EXTERNAL CATALOG iceberg_catalog_glue
PROPERTIES
(
"type" = "iceberg",
"iceberg.catalog.type" = "glue",
"aws.glue.use_instance_profile" = "false",
"aws.glue.access_key" = "<iam_user_access_key>",
"aws.glue.secret_key" = "<iam_user_secret_key>",
"aws.glue.region" = "us-west-2",
"aws.s3.use_instance_profile" = "false",
"aws.s3.access_key" = "<iam_user_access_key>",
"aws.s3.secret_key" = "<iam_user_secret_key>",
"aws.s3.region" = "us-west-2"
);
If you choose vended credential
If you choose REST catalog with vended credential, run a command like below:
CREATE EXTERNAL CATALOG polaris_s3
PROPERTIES
(
"type" = "iceberg",
"iceberg.catalog.uri" = "http://xxx:xxx/api/catalog",
"iceberg.catalog.type" = "rest",
"iceberg.catalog.rest.nested-namespace-enabled"="true",
"iceberg.catalog.security" = "oauth2",
"iceberg.catalog.oauth2.credential" = "xxxxx:xxxx",
"iceberg.catalog.oauth2.scope"='PRINCIPAL_ROLE:ALL',
"iceberg.catalog.warehouse" = "iceberg_catalog",
"aws.s3.region" = "us-west-2"
);
HDFS
If you use HDFS as storage, run a command like below:
CREATE EXTERNAL CATALOG iceberg_catalog_hms
PROPERTIES
(
"type" = "iceberg",
"iceberg.catalog.type" = "hive",
"hive.metastore.uris" = "thrift://xx.xx.xx.xx:9083"
);
S3-compatible storage system
Use MinIO as an example. Run a command like below:
CREATE EXTERNAL CATALOG iceberg_catalog_hms
PROPERTIES
(
"type" = "iceberg",
"iceberg.catalog.type" = "hive",
"hive.metastore.uris" = "thrift://xx.xx.xx.xx:9083",
"aws.s3.enable_ssl" = "true",
"aws.s3.enable_path_style_access" = "true",
"aws.s3.endpoint" = "<s3_endpoint>",
"aws.s3.access_key" = "<iam_user_access_key>",
"aws.s3.secret_key" = "<iam_user_secret_key>"
);
Microsoft Azure Storage
Azure Blob Storage
-
If you choose the Shared Key authentication method, run a command like below:
CREATE EXTERNAL CATALOG iceberg_catalog_hms
PROPERTIES
(
"type" = "iceberg",
"iceberg.catalog.type" = "hive",
"hive.metastore.uris" = "thrift://xx.xx.xx.xx:9083",
"azure.blob.storage_account" = "<blob_storage_account_name>",
"azure.blob.shared_key" = "<blob_storage_account_shared_key>"
); -
If you choose the SAS Token authentication method, run a command like below:
CREATE EXTERNAL CATALOG iceberg_catalog_hms
PROPERTIES
(
"type" = "iceberg",
"iceberg.catalog.type" = "hive",
"hive.metastore.uris" = "thrift://xx.xx.xx.xx:9083",
"azure.blob.storage_account" = "<blob_storage_account_name>",
"azure.blob.container" = "<blob_container_name>",
"azure.blob.sas_token" = "<blob_storage_account_SAS_token>"
); -
If you choose REST catalog with vended credential, run a command like below:
CREATE EXTERNAL CATALOG polaris_azure
PROPERTIES (
"type" = "iceberg",
"iceberg.catalog.uri" = "http://xxx:xxx/api/catalog",
"iceberg.catalog.type" = "rest",
"iceberg.catalog.rest.nested-namespace-enabled"="true",
"iceberg.catalog.security" = "oauth2",
"iceberg.catalog.oauth2.credential" = "xxxxx:xxxx",
"iceberg.catalog.oauth2.scope"='PRINCIPAL_ROLE:ALL',
"iceberg.catalog.warehouse" = "iceberg_catalog"
);
Azure Data Lake Storage Gen1
-
If you choose the Managed Service Identity authentication method, run a command like below:
CREATE EXTERNAL CATALOG iceberg_catalog_hms
PROPERTIES
(
"type" = "iceberg",
"iceberg.catalog.type" = "hive",
"hive.metastore.uris" = "thrift://xx.xx.xx.xx:9083",
"azure.adls1.use_managed_service_identity" = "true"
); -
If you choose the Service Principal authentication method, run a command like below:
CREATE EXTERNAL CATALOG iceberg_catalog_hms
PROPERTIES
(
"type" = "iceberg",
"iceberg.catalog.type" = "hive",
"hive.metastore.uris" = "thrift://xx.xx.xx.xx:9083",
"azure.adls1.oauth2_client_id" = "<application_client_id>",
"azure.adls1.oauth2_credential" = "<application_client_credential>",
"azure.adls1.oauth2_endpoint" = "<OAuth_2.0_authorization_endpoint_v2>"
);
Azure Data Lake Storage Gen2
-
If you choose the Managed Identity authentication method, run a command like below:
CREATE EXTERNAL CATALOG iceberg_catalog_hms
PROPERTIES
(
"type" = "iceberg",
"iceberg.catalog.type" = "hive",
"hive.metastore.uris" = "thrift://xx.xx.xx.xx:9083",
"azure.adls2.oauth2_use_managed_identity" = "true",
"azure.adls2.oauth2_tenant_id" = "<service_principal_tenant_id>",
"azure.adls2.oauth2_client_id" = "<service_client_id>"
); -
If you choose the Shared Key authentication method, run a command like below:
CREATE EXTERNAL CATALOG iceberg_catalog_hms
PROPERTIES
(
"type" = "iceberg",
"iceberg.catalog.type" = "hive",
"hive.metastore.uris" = "thrift://xx.xx.xx.xx:9083",
"azure.adls2.storage_account" = "<storage_account_name>",
"azure.adls2.shared_key" = "<shared_key>"
); -
If you choose the Service Principal authentication method, run a command like below:
CREATE EXTERNAL CATALOG iceberg_catalog_hms
PROPERTIES
(
"type" = "iceberg",
"iceberg.catalog.type" = "hive",
"hive.metastore.uris" = "thrift://xx.xx.xx.xx:9083",
"azure.adls2.oauth2_client_id" = "<service_client_id>",
"azure.adls2.oauth2_client_secret" = "<service_principal_client_secret>",
"azure.adls2.oauth2_client_endpoint" = "<service_principal_client_endpoint>"
); -
If you choose REST catalog with vended credential, run a command like below:
CREATE EXTERNAL CATALOG polaris_azure
PROPERTIES (
"type" = "iceberg",
"iceberg.catalog.uri" = "http://xxx:xxx/api/catalog",
"iceberg.catalog.type" = "rest",
"iceberg.catalog.rest.nested-namespace-enabled"="true",
"iceberg.catalog.security" = "oauth2",
"iceberg.catalog.oauth2.credential" = "xxxxx:xxxx",
"iceberg.catalog.oauth2.scope"='PRINCIPAL_ROLE:ALL',
"iceberg.catalog.warehouse" = "iceberg_catalog"
);
Google GCS
-
If you choose the VM-based authentication method, run a command like below:
CREATE EXTERNAL CATALOG iceberg_catalog_hms
PROPERTIES
(
"type" = "iceberg",
"iceberg.catalog.type" = "hive",
"hive.metastore.uris" = "thrift://xx.xx.xx.xx:9083",
"gcp.gcs.use_compute_engine_service_account" = "true"
); -
If you choose the service account-based authentication method, run a command like below:
CREATE EXTERNAL CATALOG iceberg_catalog_hms
PROPERTIES
(
"type" = "iceberg",
"iceberg.catalog.type" = "hive",
"hive.metastore.uris" = "thrift://xx.xx.xx.xx:9083",
"gcp.gcs.service_account_email" = "<google_service_account_email>",
"gcp.gcs.service_account_private_key_id" = "<google_service_private_key_id>",
"gcp.gcs.service_account_private_key" = "<google_service_private_key>"
); -
If you choose the impersonation-based authentication method:
-
If you make a VM instance impersonate a service account, run a command like below:
CREATE EXTERNAL CATALOG iceberg_catalog_hms
PROPERTIES
(
"type" = "iceberg",
"iceberg.catalog.type" = "hive",
"hive.metastore.uris" = "thrift://xx.xx.xx.xx:9083",
"gcp.gcs.use_compute_engine_service_account" = "true",
"gcp.gcs.impersonation_service_account" = "<assumed_google_service_account_email>"
); -
If you make a service account impersonate another service account, run a command like below:
CREATE EXTERNAL CATALOG iceberg_catalog_hms
PROPERTIES
(
"type" = "iceberg",
"iceberg.catalog.type" = "hive",
"hive.metastore.uris" = "thrift://xx.xx.xx.xx:9083",
"gcp.gcs.service_account_email" = "<google_service_account_email>",
"gcp.gcs.service_account_private_key_id" = "<meta_google_service_account_email>",
"gcp.gcs.service_account_private_key" = "<meta_google_service_account_email>",
"gcp.gcs.impersonation_service_account" = "<data_google_service_account_email>"
);
-
-
If you choose REST catalog with vended credential, run a command like below:
CREATE EXTERNAL CATALOG polaris_gcp
PROPERTIES (
    "type"  =  "iceberg",
    "iceberg.catalog.uri"  = "http://xxx:xxx/api/catalog",
    "iceberg.catalog.type"  =  "rest",
    "iceberg.catalog.rest.nested-namespace-enabled"="true",
    "iceberg.catalog.security" = "oauth2",
    "iceberg.catalog.oauth2.credential" = "xxxxx:xxxx",
    "iceberg.catalog.oauth2.scope"='PRINCIPAL_ROLE:ALL',
    "iceberg.catalog.warehouse" = "iceberg_catalog"
);
Use your catalog
View Iceberg catalogs
You can use SHOW CATALOGS to query all catalogs in the current StarRocks cluster:
SHOW CATALOGS;
You can also use SHOW CREATE CATALOG to query the creation statement of an external catalog. The following example queries the creation statement of an Iceberg catalog named iceberg_catalog_glue:
SHOW CREATE CATALOG iceberg_catalog_glue;
Switch to an Iceberg Catalog and a database in it
You can use one of the following methods to switch to an Iceberg catalog and a database in it:
-
Use SET CATALOG to specify an Iceberg catalog in the current session, and then use USE to specify an active database:
-- Switch to a specified catalog in the current session:
SET CATALOG <catalog_name>
-- Specify the active database in the current session:
USE <db_name> -
Directly use USE to switch to an Iceberg catalog and a database in it:
USE <catalog_name>.<db_name>
Drop an Iceberg catalog
You can use DROP CATALOG to drop an external catalog.
The following example drops an Iceberg catalog named iceberg_catalog_glue:
DROP Catalog iceberg_catalog_glue;
View the schema of an Iceberg table
You can use one of the following syntaxes to view the schema of an Iceberg table:
-
View schema
DESC[RIBE] <catalog_name>.<database_name>.<table_name> -
View schema and location from the CREATE statement
SHOW CREATE TABLE <catalog_name>.<database_name>.<table_name>
Query an Iceberg table
-
Use SHOW DATABASES to view the databases in your Iceberg cluster:
SHOW DATABASES FROM <catalog_name> -
Use SELECT to query the destination table in the specified database:
SELECT count(*) FROM <table_name> LIMIT 10
Iceberg DDL Operations
For DDL operations (CREATE/DROP DATABASE, CREATE/DROP TABLE, and CREATE/ALTER VIEW), see Iceberg DDL operations.
Iceberg DML Operations
For DML operations (INSERT), see Iceberg DML operations.
Iceberg Stored Procedures
For Iceberg stored procedures (using snapshots, performing manual Compaction), see Iceberg Stored Procedures.
Configure metadata caching
The metadata files of your Iceberg cluster may be stored in remote storage such as AWS S3 or HDFS. By default, StarRocks caches Iceberg metadata in memory. To accelerate queries, StarRocks adopts a two-level metadata caching mechanism, with which it can cache metadata both in memory and on disk. For each initial query, StarRocks caches their computation results. If any subsequent query that is semantically equivalent to a previous query is issued, StarRocks first attempts to retrieve the requested metadata from its caches, and it retrieves the metadata from the remote storage only when the metadata cannot be hit in its caches.
StarRocks uses the Least Recently Used (LRU) algorithm to cache and evict data. The basic rules are as follows:
- StarRocks first attempts to retrieve the requested metadata from the memory. If the metadata cannot be hit in the memory, StarRock attempts to retrieve the metadata from the disks. The metadata that StarRocks has retrieved from the disks will be loaded into the memory. If the metadata cannot be hit in the disks either, StarRock retrieves the metadata from the remote storage and caches the retrieved metadata in the memory.
- StarRocks writes the metadata evicted out of the memory into the disks, but it directly discards the metadata evicted out of the disks.
From v3.3.3 onwards, StarRocks supports the periodic metadata refresh strategy. You can adjust the Iceberg metadata caching plan using the system variable plan_mode.
FE Configurations on Iceberg metadata caching
enable_iceberg_metadata_disk_cache
- Unit: N/A
- Default value:
false - Description: Specifies whether to enable the disk cache.
iceberg_metadata_cache_disk_path
- Unit: N/A
- Default value:
StarRocksFE.STARROCKS_HOME_DIR + "/caches/iceberg" - Description: The save path of cached metadata files on disk.
iceberg_metadata_disk_cache_capacity
- Unit: Bytes
- Default value:
2147483648, equivalent to 2 GB - Description: The maximum size of cached metadata allowed on disk.
iceberg_metadata_memory_cache_capacity
- Unit: Bytes
- Default value:
536870912, equivalent to 512 MB - Description: The maximum size of cached metadata allowed in memory.
iceberg_metadata_memory_cache_expiration_seconds
- Unit: Seconds
- Default value:
86500 - Description: The amount of time after which a cache entry in memory expires counting from its last access.
iceberg_metadata_disk_cache_expiration_seconds
- Unit: Seconds
- Default value:
604800, equivalent to one week - Description: The amount of time after which a cache entry on disk expires counting from its last access.
iceberg_metadata_cache_max_entry_size
- Unit: Bytes
- Default value:
8388608, equivalent to 8 MB - Description: The maximum size of a file that can be cached. Files whose size exceeds the value of this parameter cannot be cached. If a query requests these files, StarRocks retrieves them from the remote storage.
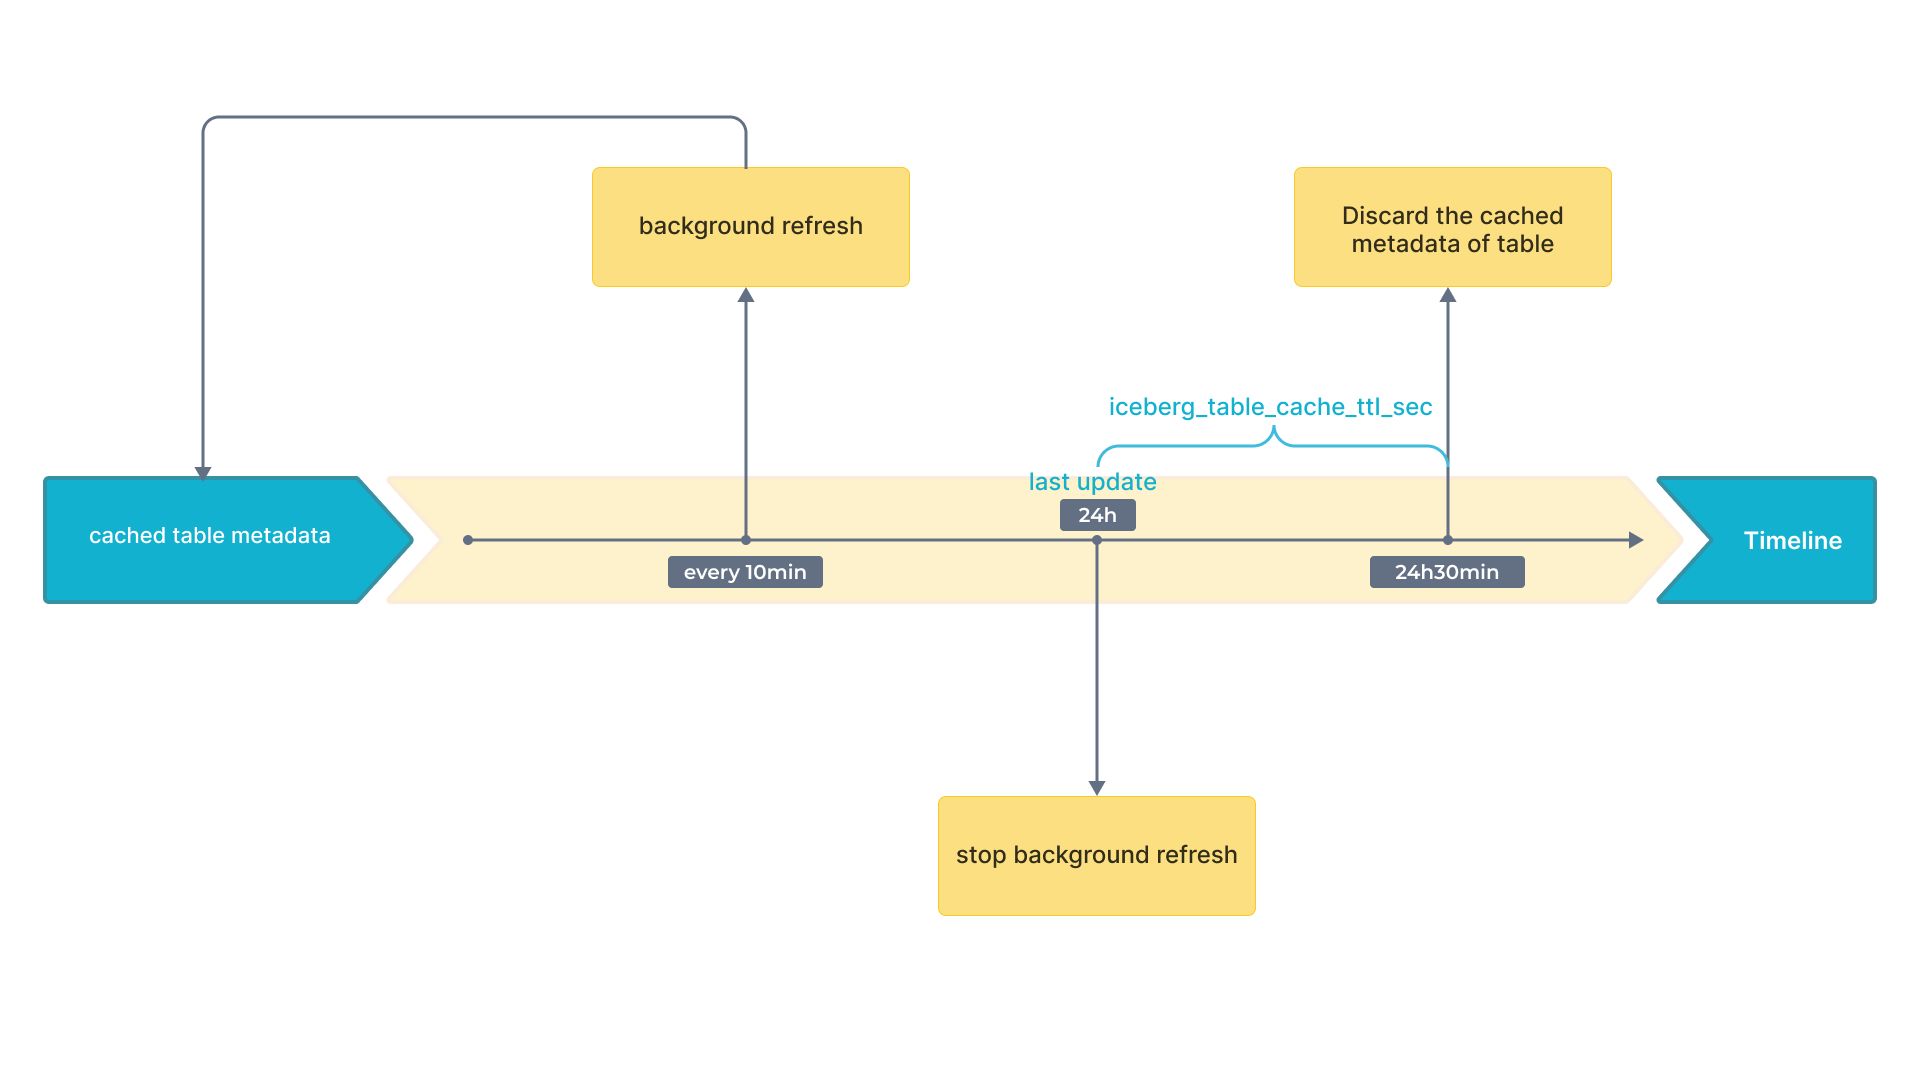
enable_background_refresh_connector_metadata
- Unit: -
- Default value: true
- Description: Whether to enable the periodic Iceberg metadata cache refresh. After it is enabled, StarRocks polls the metastore (Hive Metastore or AWS Glue) of your Iceberg cluster, and refreshes the cached metadata of the frequently accessed Iceberg catalogs to perceive data changes.
trueindicates to enable the Iceberg metadata cache refresh, andfalseindicates to disable it.
background_refresh_metadata_interval_millis
- Unit: Millisecond
- Default value: 600000
- Description: The interval between two consecutive Iceberg metadata cache refreshes. - Unit: millisecond.
background_refresh_metadata_time_secs_since_last_access_sec
- Unit: Second
- Default value: 86400
- Description: The expiration time of an Iceberg metadata cache refresh task. For the Iceberg catalog that has been accessed, if it has not been accessed for more than the specified time, StarRocks stops refreshing its cached metadata. For the Iceberg catalog that has not been accessed, StarRocks will not refresh its cached metadata.
Appendix A: Periodic Metadata Refresh Strategy
Iceberg supports snapshots. With the newest snapshot, you can get the newest result. Therefore, only cached snapshots can influence data freshness. As a result, you only need to pay attention to the refresh strategy of cache that contains snapshot.
The following flowchart shows the time intervals on a timeline.
Appendix B: Metadata File Parsing
-
Distributed Plan for Large volume of Metadata
To handle large volume of metadata effectively, StarRocks employs a distributed approach using multiple BE and CN nodes. This method leverages the parallel computing capabilities of modern query engines, which can distribute tasks such as reading, decompressing, and filtering manifest files across multiple nodes. By processing these manifest files in parallel, the time required for metadata retrieval is significantly reduced, leading to faster job planning. This is particularly beneficial for large queries involving numerous manifest files, as it eliminates single-point bottlenecks and enhances overall query execution efficiency.
-
Local Plan for Small volume of Metadata
For smaller queries, where the repeated decompression and parsing of manifest files can introduce unnecessary delays, a different strategy is employed. StarRocks caches deserialized memory objects, especially Avro files, to address this issue. By storing these deserialized files in memory, the system can bypass the decompression and parsing stages for subsequent queries. This caching mechanism allows direct access to the required metadata, significantly reducing retrieval times. As a result, the system becomes more responsive and better suited to meet high query demands and materialized view rewriting needs.
-
Adaptive Metadata Retrieval Strategy (Default)
StarRocks is designed to automatically select the appropriate metadata retrieval method based on various factors, including the number of FE and BE/CN nodes, their CPU core counts, and the number of manifest files required for the current query. This adaptive approach ensures that the system dynamically optimizes metadata retrieval without the need for manual adjustment of metadata-related parameters. By doing so, StarRocks provides a seamless experience, balancing between distributed and local plans to achieve optimal query performance under different conditions.
You can adjust the Iceberg metadata caching plan using the system variable plan_mode.
